
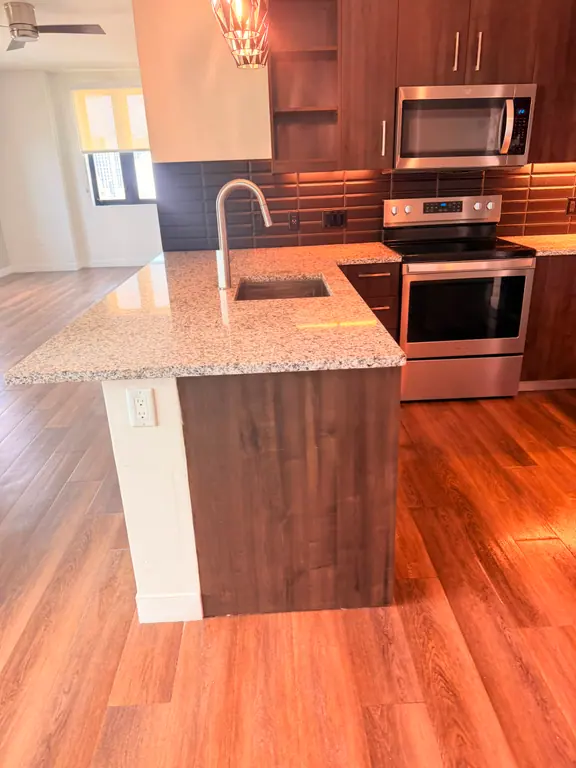
You notice it while wiping down the kitchen island before guests arrive. The granite used to reflect the pendant lights, but now it looks flat, cloudy, and slightly darker around the faucet. In a Miami-Dade kitchen, morning espresso, citrus spills, hard-water film, humidity, and frequent wipe-downs can make a polished surface look tired long before the stone itself is damaged.
The mistake is reaching for a polish spray before identifying the problem. Polishing granite countertops is a diagnosis-first job, because residue, chemical etching, and worn sealer need different fixes. A finishing cream can improve light dullness, but it won't remove deep scratches or restore a surface that has been mechanically altered.
Table of Contents
- Why Granite Countertops Lose Their Shine
- Cleaning and Prep Before You Polish
- Step-by-Step Polishing Process
- What to Do and Never Do on Granite
- How Often to Polish and Reseal
- When to Call a Professional
- Your Granite Polishing Checklist
Why Granite Countertops Lose Their Shine
Granite is durable, but its polished finish isn't permanent. The surface is refined to create reflection, and daily cleaning, spills, moisture, and abrasion gradually affect that finish. Manufacturers and trade guides commonly recommend resealing granite about once every 12 months for active kitchen use, while denser stones may retain sealer for 2 to 3 years, as explained in this granite durability guide.
A dull countertop usually falls into one of three categories:
- Residue haze: Soap film, hard-water minerals, cooking oils, and old film-forming products sit on top of the stone and scatter light. The granite may still be polished underneath.
- Chemical etching: Vinegar, lemon, citrus cleaners, wine, and similar acids can dull isolated areas by altering the polished surface.
- Worn sealer: When protection has weakened, moisture can penetrate more readily, darkening portions of the slab and making the stone look less lively.
A quick way to identify the defect
Start with a clean, inconspicuous area. Dampen a soft cloth with a 50/50 mixture of isopropyl alcohol and water, wipe a small patch, and let it dry. If the shine returns briefly, residue is probably masking the surface. If distinct cloudy spots remain, suspect etching. If the entire slab looks uniformly flat or absorbs moisture easily, inspect the sealer rather than applying more polish.
That distinction matters if you're choosing replacement stone, too. For color and pattern comparisons, a resource such as selecting gray white granite slabs can help you evaluate new material, but no slab selection eliminates the need for correct care.
Practical rule: Don't polish a mystery. First decide whether you're removing a film, correcting etching, or protecting porous stone.
Cleaning and Prep Before You Polish
Polishing compound should be the third phase, not the first. Any cleaner residue, grease, mineral film, or loose grit left on the counter can interfere with the abrasive or finishing cream. In practice, many disappointing DIY results come from polishing over a surface that was never properly prepared.
Remove loose material first
Clear the counter completely, including coffee makers, knife blocks, jars, and decorative trays. Dry-dust with a clean microfiber cloth, using light overlapping strokes to lift crumbs and grit rather than dragging them across the granite. Tape around the sink, faucet base, backsplash edge, and cooktop so compound doesn't collect in joints or hardware.
Mix warm water with a few drops of mild dish soap, or use a pH-neutral cleaner made for natural stone. Apply it to the cloth or non-abrasive pad instead of flooding the counter. Work in manageable areas, then wipe with clean water and remove the moisture.
For a broader cleaning routine, the Sunny Day Pro Services granite cleaning guide is a useful reference for daily-safe products and handling habits. You can also use this kitchen cabinet cleaning guide when grease has migrated from cabinet faces onto the counter edges.
Strip residue before testing the surface
Follow the wash with a residue-removal pass using isopropyl alcohol diluted 50/50 with water. This helps lift old soap film, light mineral deposits, and remnants of previous polish products. Use a fresh microfiber cloth, change sides often, and don't let dirty solution dry back onto the stone.
Dry the granite thoroughly. Inspect it under angled light, because overhead lighting can hide dull patches and streaks. If the surface still shows isolated marks after cleaning, don't keep adding cream. You may be looking at etching or a damaged sealer, not dirt.
A polished finish can't reflect clearly through a film. Cleaning isn't a preliminary courtesy, it determines whether polishing can contact the stone evenly.
Step-by-Step Polishing Process
For light dulling, controlled hand work is safer than aggressive machine polishing. Use a fine diamond hand pad, clean water, a granite-specific finishing cream, and several microfiber cloths. Work in small sections of about 2 square feet, a size supported by spot-restoration guidance from DG Floors.
Use the fine abrasive first
Lightly dampen a 3,000-grit diamond pad with water. Move it across one section in slow, overlapping circular passes with even pressure. Keep the pad moving, and don't press harder when the surface looks slow to respond. The purpose is to refine the finish, not to grind a depression into the slab.
Wipe the section clean with microfiber and inspect it from several angles. The stone should feel smooth and show a soft, even sheen. If you see a distinct scratch or etched patch, stop and reassess. A 3,000-grit pad is suited to light restoration, not deep correction.
Apply a very small amount of finishing cream, roughly a dime-sized amount for a small working area. Buff it with a clean microfiber pad in tight, overlapping circles until the cream develops a light haze, then remove the residue with a fresh cloth. Rotate the cloth frequently so you're not spreading the same film back over the granite.
Know when a full grit sequence is necessary
A professional restoration generally progresses through diamond abrasives such as 50, 100, 200, 400, 800, 1500, and 3000 grit, then uses finishing powder or cream and sealer. The governing rule is simple: every scratch from the previous grit must disappear before moving forward. If a coarse scratch remains beneath the final polish, the countertop can look patchy or show swirls under sunlight.
The following video demonstrates the type of hands-on motion and pad control required for stone polishing:
A compact hand tool is enough for a small repair. A power buffer can cover more area, but it also makes it easier to create swirls, concentrate heat, or let product dry before buffing. If you're considering equipment such as a Ryobi 0.5 amp orbital buffer, use it only if you understand its speed, pad, pressure, and residue-control requirements.
What to Do and Never Do on Granite
Granite care comes down to protecting the sealer and avoiding chemicals or tools that alter the polished surface. Good habits are quiet and repetitive. Damage usually comes from a shortcut that seems harmless because the counter looks fine immediately afterward.
Habits that preserve the finish
- Blot spills: Lift coffee, wine, oils, and citrus rather than dragging them across the surface.
- Use barriers: Cutting boards, trivets, and coasters reduce contact with heat, sharp tools, oils, and staining liquids.
- Choose neutral cleaners: Use a stone-safe, pH-neutral product or mild soap solution, then remove the residue with clean water.
- Check vulnerable areas: Pay attention to the sink, faucet, cooktop, seams, and frequently used prep zones.
- Reseal when needed: Follow the water-drop test and the condition of the surface rather than relying only on appearance.
Shortcuts that create dullness
Vinegar, lemon juice, acidic sprays, bleach, and ammonia-based products have no place in routine granite care. Acidic substances can etch or weaken protection, while strong cleaners may leave their own residue or create a cycle of repeated chemical exposure.
Abrasive pads are another common problem. They can create a uniform haze that looks like dirt but won't wash away. Letting sunscreen, citronella, cooking oil, wine, or coffee sit overnight is especially risky on outdoor counters and rental properties where a small missed spill can remain unnoticed between cleanings.
Miami-Dade adds practical complications. Hard-water film often gathers around faucets, while humid air and salt exposure near the coast can make frequent wiping feel necessary. The answer isn't more aggressive scrubbing. The safer rule is:
If a spray isn't clearly safe for sealed natural stone, don't put it on granite.
For surfaces made from other materials, use a product matched to that material, such as this laminate countertop cleaner, rather than assuming granite and laminate respond the same way.
How Often to Polish and Reseal
A practical maintenance plan separates light polishing, sealer checks, and full restoration. Dullness is a diagnosis problem first. Residue may need cleaning, etching may require refinishing, and worn sealer may need replacement. Polishing the wrong condition wastes product and can leave more buildup behind.
Many fabricators recommend annual resealing in high-use kitchens, though denser stones may extend that interval. Granite in a rental turnover, coastal property, or busy island deserves closer inspection than a lightly used bathroom vanity. Hard water around faucets, humid air, salt exposure, and frequent cooking can shorten the useful life of a sealer.
Build the schedule around use
Denser granite may hold sealer for 2 to 3 years, but the interval depends on the stone, product, spills, cleaning habits, and traffic. Treat that range as a maintenance reference, not a fixed appointment. After applying sealer, follow the product's cure instructions and inspect the surface once it has cured. It should resist moisture evenly. If some areas darken quickly, remain tacky, or look patchy, stop adding coats and reassess the application.
Light maintenance polishing makes sense when the stone is clean but has a muted, even reflection. If a finishing cream restores that reflection, the problem was likely surface residue or mild cosmetic dullness. If the cream changes nothing, stop repeating the application. Persistent haze, uneven reflection, or marks that remain after cleaning point to etching or wear that consumer polish cannot correct.
A turnover routine should be deliberate:
- Deep-clean first: Remove grease, mineral film, and old product residue.
- Inspect worn paths: Check the areas in front of the sink, cooktop, and primary prep zone.
- Spot-polish carefully: Treat only light, localized dullness.
- Apply sealer correctly: Use a compatible product only where the stone needs protection.
- Inspect under angled light: Confirm a consistent finish before listing the property or handing over keys.
Use the wet season as a prompt to inspect faucet zones, splash areas, and outdoor counters. In drier months, look for spray residue, dust, and fine abrasive grit. The calendar prompts inspection, but the stone's condition determines the work. A consistent maintenance log also helps identify whether dullness returns after cleaning, polishing, or sealing.
When to Call a Professional
Consumer polish works on a narrow problem, light surface dullness after the stone has been cleaned. It doesn't erase deep scratches, repair chips, correct uneven seams, or reverse broad chemical etching. A homeowner who keeps applying cream to those defects is usually adding residue while leaving the underlying damage untouched.
Call a fabricator or stone-restoration specialist when you see:
- Persistent cloudy etching: Cleaning doesn't lift the marks, and the surface remains uneven in reflection.
- Deep scratches or chips: Damage near the sink, cooktop, corners, or seams may require filling and staged refinement.
- Lippage: One slab edge sits higher than another, creating a physical transition that polish won't level.
- Penetrated stains: Dark areas remain after surface cleaning and may extend below the sealer.
- Broad water marks: Mineral or moisture patterns across a large area often need more than spot treatment.
A professional may use diamond honing in stages, fill micro-pits with resin, and rebuild the finish through progressively finer abrasives. That process is different from wiping on a topical product, and it gives the technician a chance to correct the cause before applying a final polish and sealer.
| Sign You See | Fix It Yourself | Call a Pro |
|---|---|---|
| Light haze that disappears after residue removal | Test a small area with a fine pad and finishing cream | Call if the haze returns or remains widespread |
| One small dull spot | Work in a controlled section with clean water and a fine abrasive | Call if the spot is etched or visibly lower than the surrounding stone |
| Deep scratch or chip | Don't grind aggressively without training | Use a restoration specialist for filling and refinement |
| Uneven seam or lippage | Clean and document the area | Contact the fabricator or stone professional |
| More than 30 percent of the surface looks dull after cleaning | Don't attempt broad DIY polishing | Call a fabricator or restoration specialist |
That 30 percent threshold is a practical decision rule for avoiding uneven do-it-yourself repairs. A variable-speed grinder can remove material quickly, but one wrong grit, an uneven pass, or excessive pressure can leave swirl marks that require professional correction.
Your Granite Polishing Checklist
A dull counter needs a recorded diagnosis before any product touches the stone. Use this checklist to choose the next action, especially in humid Miami-Dade kitchens where residue and hard-water film can return quickly.
Record the defect you identified.
Mark the result as residue, etching, or worn sealer. This keeps the product choice in step 4 tied to the actual problem instead of treating every dull area as a polishing job.Set the work boundary.
Mark the affected section and note nearby seams, faucets, backsplashes, and appliances. A defined boundary makes it easier to compare the repaired area with surrounding granite and prevents an uneven finish during a rental turnover.Choose the least aggressive correction.
Residue may need removal and a fine finishing product. Etching requires controlled abrasive work, while worn sealer calls for resealing after the surface is clean. A consumer polish cannot rebuild missing stone or erase a deep chemical mark.Test the selected product or pad.
Work on about 2 square feet in an inconspicuous area. Use slow, overlapping passes with a damp fine diamond pad when appropriate, then inspect the result under angled light. Stop if the test creates swirls, a darker patch, or a different sheen.Finish lightly and remove all residue.
Apply finishing cream sparingly, buff in controlled circles, and wipe with a fresh microfiber cloth. Extra product leaves a film rather than improving the shine. Check faucet zones and edges, where mineral deposits and trapped cleaner commonly remain.Decide whether sealing is due.
Treat polishing and sealing as separate tasks. If the water-drop test shows poor resistance, apply a granite-compatible sealer to clean, dry stone and follow its cure instructions before normal use. Granite may hold sealer for 1 to 3 years, depending on density and use.Record the maintenance handoff.
Keep a printable cleaning checklist inside the cabinet. List the defect, product used, test result, and date of the next inspection so household members or turnover crews know what to report.
Use this checklist for light surface dullness only. Deep scratches, chemical etching, cracks, chips, lippage, and broad unevenness require a trained stone professional. A local cleaning service can remove buildup before maintenance begins, but restoration work needs a stone specialist.