Maintaining the cleanliness of your upholstery is like giving your furniture a breath of fresh air. We often underestimate the impact that our sofas and chairs can have on the overall ambiance of our living spaces. In this guide on how to clean upholstery, we’ll delve into the importance of keeping your furniture spick and span, not just for appearances but for the health and longevity of your beloved pieces. From those accidental spills to everyday wear and tear, upholstery bears the brunt of our daily lives, making regular cleaning not just a chore but a necessity. Let’s explore the myriad benefits of this maintenance routine, and discover how simple yet effective cleaning practices can revitalize your upholstery, creating a cozy and inviting haven for you and your guests. So, get ready to embark on a journey of upholstery care that goes beyond the surface – because a clean sofa is a happy sofa!
5 Easy Steps to Clean Upholstery
Embarking on the journey of cleaning your upholstery can be transformative, not only for the aesthetics of your living space but also for the overall wellbeing of your furniture. In this step by step guide, we’ll explore a comprehensive procedure to revitalize your upholstery, tackling stains, odors, and everyday wear. The importance of this process extends beyond mere cleanliness, touching upon the preservation of fabric integrity and the enhancement of indoor air quality. By following each step meticulously, you’re not just cleaning upholstery; you’re investing in the longevity and comfort of your cherished furniture.
So, let’s dive into this detailed procedure, unraveling the secrets to a refreshed and inviting living environment.
Step 1: Gather Necessary Supplies
Before diving into the upholstery cleaning process, it’s essential to gather the right tools for the job. Here’s a checklist of supplies you’ll need:
- Upholstery Cleaner: Select a cleaner specifically designed for your type of upholstery fabric. Different fabrics may require different cleaning solutions.
- Stain Removers: Have suitable stain removers on hand to address specific stains or spots. Make sure they are compatible with your upholstery fabric.
- Soft Bristle Brush or Vacuum Cleaner: Depending on the fabric type, choose between a soft bristle brush for gentle scrubbing or a vacuum cleaner with an upholstery attachment to remove loose dirt.
- Microfiber Cloths: Use microfiber cloths for blotting and wiping. They are gentle on upholstery fabrics and effective in absorbing cleaning solutions.
- Bucket of Water: Keep a bucket of water handy for diluting cleaning solutions, rinsing clothes, and ensuring you have a clean, damp cloth when needed.
- Check Upholstery Tags for Cleaning Codes
Look for the upholstery tags attached to your furniture. These tags often provide valuable information about the recommended cleaning methods based on standardized codes. Understanding these codes ensures you use the appropriate cleaning approach for your specific upholstery fabric.
- Test Cleaning Products in a Small, Inconspicuous Area
Before applying any cleaning product to the entire upholstery surface, it’s crucial to conduct a patch test. Choose a small, inconspicuous area and apply a small amount of the cleaning solution. This test helps ensure that the product won’t cause discoloration or damage to the fabric. Always follow this precautionary step to preserve the integrity of your upholstery throughout the cleaning process.
Step 2: Vacuuming
Before diving into deep cleaning, it’s essential to start with a thorough vacuuming to eliminate loose debris and surface dirt from your upholstery.
- Remove Loose Debris: Begin by removing any loose debris from the upholstery surface. This can include crumbs, pet hair, and other small particles. Use your hands or a soft brush to gently sweep away larger debris.
- Use a Soft Bristle Brush Attachment: Attach a soft bristle brush to your vacuum cleaner to avoid causing any damage to the upholstery fabric. The gentle bristles help lift and loosen embedded dirt without scratching or harming the material.
- Pay Special Attention to Crevices and Seams: Navigate the soft bristle brush attachment into the crevices, seams, and folds of the upholstery. Dust and dirt often accumulate in these hidden areas, contributing to a dingy appearance. Thorough attention to these spots ensures a more comprehensive cleaning process.
By starting with a meticulous vacuuming routine, you set the foundation for effective deep cleaning and pave the way for a refreshed and revitalized upholstery.
Step 3: Spot Cleaning of the Upholstery
Spot cleaning is a targeted approach to address specific stains and spills on your upholstery, ensuring a thorough and effective cleaning process.
- Identify Stains and Spills: Begin the spot cleaning process by closely examining your upholstery for any visible stains or spills. Identify the type of stain to determine the most effective cleaning approach.
- Blot Stains with a Clean Cloth: Using a clean, absorbent cloth or paper towel, gently blot the stain. Avoid rubbing vigorously, as this can push the stain deeper into the fabric. The goal is to lift as much of the stain as possible.
- Apply Suitable Stain Remover: Choose an appropriate stain remover based on the type of stain and your upholstery fabric. Whether using a commercial stain remover or a homemade solution, apply it to the stained area following the product’s instructions.
- Follow Manufacturer’s Guidelines for Stain Removal: Always adhere to the manufacturer’s guidelines for stain removal to avoid damaging the upholstery fabric. Some fabrics may be more sensitive to certain cleaning agents, and following these guidelines ensures a safe and effective spot cleaning process.
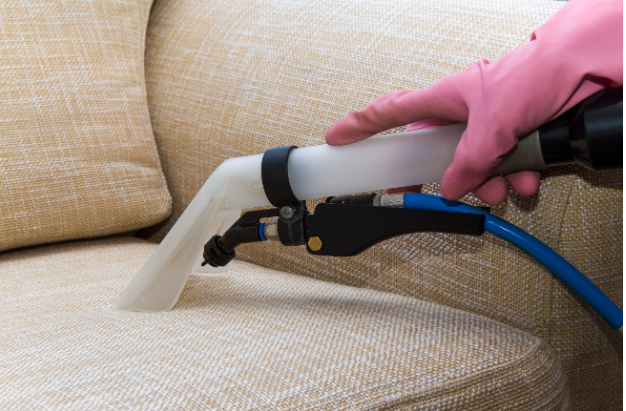
Step 4. Overall Cleaning of the Upholstery
Now that you’ve prepped your upholstery and targeted specific stains, it’s time for the comprehensive cleaning process. In this step, we’ll focus on a thorough cleansing of the entire upholstery, ensuring a uniform freshness. Following these essential substeps will help you achieve an overall clean that not only removes surface dirt but also revitalizes the fabric itself.
- Dilute Upholstery Cleaner: Start by diluting your chosen upholstery cleaner as per the manufacturer’s guidelines. Proper dilution ensures effective cleaning without compromising the fabric’s integrity.
- Apply Cleaner with a Soft Cloth or Sponge: Using a soft cloth or sponge, apply the diluted upholstery cleaner evenly across the upholstery surface. Work in small sections to ensure comprehensive coverage.
- Gently Scrub Upholstery: Employ a gentle scrubbing motion with a soft bristled brush or the cloth/sponge used for application. This step helps to agitate the cleaner, allowing it to penetrate the fabric and lift away embedded dirt.
- Wipe Down with Clean, Damp Cloth: Once the upholstery has been scrubbed, wipe it down with a clean, damp cloth. This step helps remove the cleaning solution residue and any remaining dirt, leaving your upholstery refreshed and ready to dry.
Step 5. Deodorize the Upholstery
Unveiling Step 5 in our comprehensive guide to cleaning upholstery, we shift our focus to the often overlooked yet significant aspect of deodorizing. After addressing stains and dirt, it’s time to infuse a fresh and inviting scent into your furniture. This step involves various strategies to eliminate lingering odors and maintain a pleasant ambiance in your living space.
- Use Fabric Fresheners or Baking Soda: To kickstart the deodorizing process, consider employing fabric fresheners designed for upholstery. Alternatively, the power of baking soda can work wonders in neutralizing odors. Both options provide a quick and effective way to add a delightful fragrance to your furniture.
- Allow Upholstery to Air Dry: After applying fabric fresheners or baking soda, allow your upholstery to air dry naturally. This step not only aids in the deodorizing process but also ensures that the fabric remains fresh without any residual dampness. Proper ventilation contributes to a crisp and clean scent.
- Consider Using Air Purifiers in the Room: For a continuous and holistic approach to maintaining a fresh environment, consider incorporating air purifiers in the room. These devices help filter out airborne particles, allergens, and odors, contributing to an overall clean and healthy living space. Explore this option to enhance the deodorizing effects and promote a longlasting freshness in your upholstery.
Tips for Specific Upholstery Types
Upholstery comes in a variety of materials, each requiring unique care to ensure its longevity and appearance. Tailoring your cleaning approach to the specific upholstery type can make a significant difference in maintaining the beauty and integrity of your furniture.
- Cotton Upholstery:
Cotton, known for its comfort and breathability, is a common upholstery material. To clean cotton upholstery, start by vacuuming to remove surface dirt. Use a mixture of mild detergent and water for general cleaning, and be cautious with water usage to prevent oversaturation. Regular vacuuming and timely stain treatment are key to preserving the natural fibers of cotton upholstery.
- Microfiber Upholstery:
Microfiber, a synthetic material known for its durability and stain resistance, requires a slightly different approach. For routine cleaning, use a soft brush attachment on your vacuum to remove loose dirt and dust. Stains on microfiber can often be tackled with a mixture of rubbing alcohol and water. Remember to check the manufacturer’s guidelines, as some microfiber furniture may also have specific cleaning codes.
- Velvet Upholstery:
Velvet upholstery, luxurious and soft, demands a gentle touch. Regularly vacuum with a soft brush attachment to prevent crushing the delicate fibers. For cleaning, use a mixture of mild soap and water, applying it with a soft cloth. Avoid aggressive scrubbing to maintain the texture of the velvet. Be mindful of moisture levels to prevent watermarks, and allow the upholstery to air dry thoroughly.
- Synthetic Upholstery:
Synthetic upholstery materials like polyester or nylon often mimic the look and feel of natural fabrics. Cleaning synthetic upholstery involves using a mild detergent or upholstery cleaner. Wipe down the upholstery with a clean cloth or sponge, paying attention to seams and crevices where dirt may accumulate. Check for any specific care instructions provided by the manufacturer to ensure the longevity of your synthetic upholstery.
FAQs: How to Clean Upholstery?
How often should I clean my upholstery?
The frequency of upholstery cleaning depends on factors such as usage, household environment, and the material of the upholstery. Generally, it’s recommended to perform a routine cleaning every 612 months and address spills promptly to prevent stains.Can I use water to clean all types of upholstery?
While water can be used for some upholstery types, it’s crucial to check the manufacturer’s recommendations. Water Sensitive materials like velvet may require specialized cleaning solutions, and overwetting can damage certain fabrics. Always follow the care instructions provided.
How do I remove stains from my upholstery?
Stain removal depends on the type of stain and the upholstery material. Blotting the stain with a clean cloth is a universal first step. For specific stains, use appropriate cleaning solutions, keeping in mind the material’s sensitivity. Always test any cleaning solution in an inconspicuous area first.
Can I clean upholstery myself, or should I hire a professional?
Routine cleaning and stain removal can often be done at home with the right tools and cleaning solutions. However, hiring a professional upholstery cleaner is recommended for deep cleaning, especially for delicate fabrics or extensive staining. Professionals have the expertise and equipment to handle various upholstery types. Choose Canes Cleaners’ cleaning services in Miami for the best cleaning experience.
What precautions should I take during the upholstery cleaning process?
Prioritize proper ventilation to aid in drying and prevent mold growth. Avoid over wetting the upholstery to prevent damage and watermarks. Always test cleaning products in a hidden area to ensure compatibility. Additionally, follow the manufacturer’s guidelines and cleaning codes, if available, to maintain the integrity of the upholstery.
Conclusion
Understanding how to clean upholstery is not merely a chore but a proactive investment in the longevity and aesthetics of your cherished furniture. As we’ve navigated through the comprehensive steps and tailored tips for specific upholstery types, it becomes evident that regular maintenance transcends the realm of cleanliness alone. By adopting these practices, you’re not just removing stains or dirt; you’re safeguarding the fibers, colors, and overall integrity of your upholstery. The intrinsic connection between a well-maintained sofa or chair and its extended lifespan is undeniable, ensuring that your furniture remains a source of comfort and pride for years to come. Beyond practicality, the aesthetics of a clean upholstery transform your living space into a welcoming haven, reflecting the care and attention you invest in your home. So, in the pursuit of a vibrant, inviting living environment, the how-to-clean-upholstery guide becomes a roadmap to both preservation and enhancement, proving that the beauty of well-maintained upholstery truly stands the test of time.