How to Clean Stainless Steel Sink
In the heart of every kitchen, the stainless steel sink stands as a workhorse, enduring daily demands with unwavering resilience. Yet, amidst the hustle of meal preparations and dishwashing, it is easy to overlook the crucial task of maintaining its gleaming facade. A clean stainless steel sink not only enhances the aesthetics of the kitchen but also promotes a hygienic environment. In this comprehensive guide on how to clean stainless steel sinks, we delve into the significance of regularly tending to this kitchen essential and provide an overview of the cleaning process. From gathering the right supplies to unveiling the secrets of stain removal and polishing, each step is a testament to the transformative power of proper maintenance. Join us on a journey to discover the art of preserving the brilliance and functionality of your stainless steel sink, ensuring it remains a beacon of cleanliness in your culinary space.
Step by Step Procedure to Stainless Steel Sink
Embarking on the journey to clean stainless steel sink is more than just a routine chore—it’s a transformative experience for your kitchen. In this step by step guide, we’re rolling up our sleeves to tackle the grime and unveil the brilliance beneath. From the initial clearout to the final polish, we’ll walk you through each actionpacked stage, ensuring your sink not only gleams but also maintains its hygiene and resilience. Get ready to conquer stains, banish water spots, and revel in the radiant glow of a meticulously cleaned stainless steel sink. So, grab your cleaning essentials, and let’s dive into the hands-on adventure of revitalizing your kitchen’s shining centerpiece.
Step 1. Gather Cleaning Supplies:
Before we embark on the journey to revive the brilliance of your stainless steel sink, let’s assemble the supplies. The right arsenal of cleaning supplies is the key to ensuring a thorough and safe restoration process. From the gentle touch of mild dish soap to the abrasive power of baking soda, each item in our cleaning kit plays a vital role in bringing your sink back to its pristine glory.
• Mild Dish Soap: Mild dish soap is a kitchen staple revered for its dual ability to cut through grease and grime while remaining gentle on stainless steel surfaces. Its effectiveness lies in its ability to break down and lift away everyday dirt without causing any harm or abrasions to the stainless steel.
• Baking Soda: This powdery substance serves as a mild abrasive when mixed with water, making it highly effective in removing stubborn stains. It’s a goto solution for tackling both tough stains and maintaining the overall brilliance of your sink.
• Soft Cloth: Unlike abrasive materials that can scratch or dull the sink’s finish, a soft cloth is the perfect companion for wiping down surfaces. Its smooth texture ensures that cleaning is not only effective but also safe, leaving your stainless steel sink gleaming without any undesirable marks or scratches.
• Microfiber Towel: The microfiber towel takes the spotlight for its exceptional absorbency and lintfree properties, making it an ideal choice for achieving a streak free finish on your stainless steel sink.
Importance of Using NonAbrasive and Stainless SteelSafe Cleaners:
Maintaining the integrity of your stainless steel sink is paramount. Using non abrasive and stainless steel safe cleaners ensures that the cleaning process is effective without causing scratches or compromising the sink’s sleek finish. These carefully chosen cleaners not only preserve the aesthetic appeal of your sink but also contribute to its longevity, making them indispensable tools in your quest for a gleaming stainless steel centerpiece.
Step 2. Clear the Sink
Embarking on the journey to cleaning stainless steel sink requires a strategic approach, and the first step is to clear the stage for a thorough cleaning. As we delve into the heart of the cleaning process, let’s begin by creating a clean canvas—free of dishes, utensils, and any lingering debris. This initial step not only sets the foundation for a meticulous clean but also ensures an unobstructed path to a hygienic and radiant sink.
• Remove Dishes, Utensils, and Any Debris:
Begin the transformation by clearing the sink of all its occupants—dishes, utensils, and any miscellaneous items that may have found their way into the basin. This not only provides a clear working space but also prevents any hindrance during the subsequent cleaning steps. Place the items aside, allowing you unrestricted access to the entirety of the sink.
• Dispose of Food Particles in the Garbage or Compost:
With the sink liberated from its contents, turn your attention to disposing of food particles responsibly. Gather any debris or remnants and discard them in the garbage or compost bin. This not only aids in preventing unpleasant odors but also contributes to an eco friendly kitchen routine. By ensuring a clean slate, you’re ready to tackle the next phases of the cleaning process with efficiency and precision.
• PreRinse and Wet the Sink
Before diving into the nitty gritty of scrubbing and polishing, it’s essential to give your stainless steel sink a refreshing prelude. Start by rinsing the sink with warm water, allowing it to dance away loose debris and surface impurities. This initial step not only provides a quick cleanse but also sets the stage for the main act. Following the rinse, wet the entire sink surface—every nook and cranny—preparing it like a blank canvas eager to absorb the benefits of the impending cleaning process. This simple yet crucial prelude ensures that the sink is primed and ready for a thorough and effective transformation. So, let the water flow, and let’s embark on the journey to unveil the brilliance of your stainless steel sink.
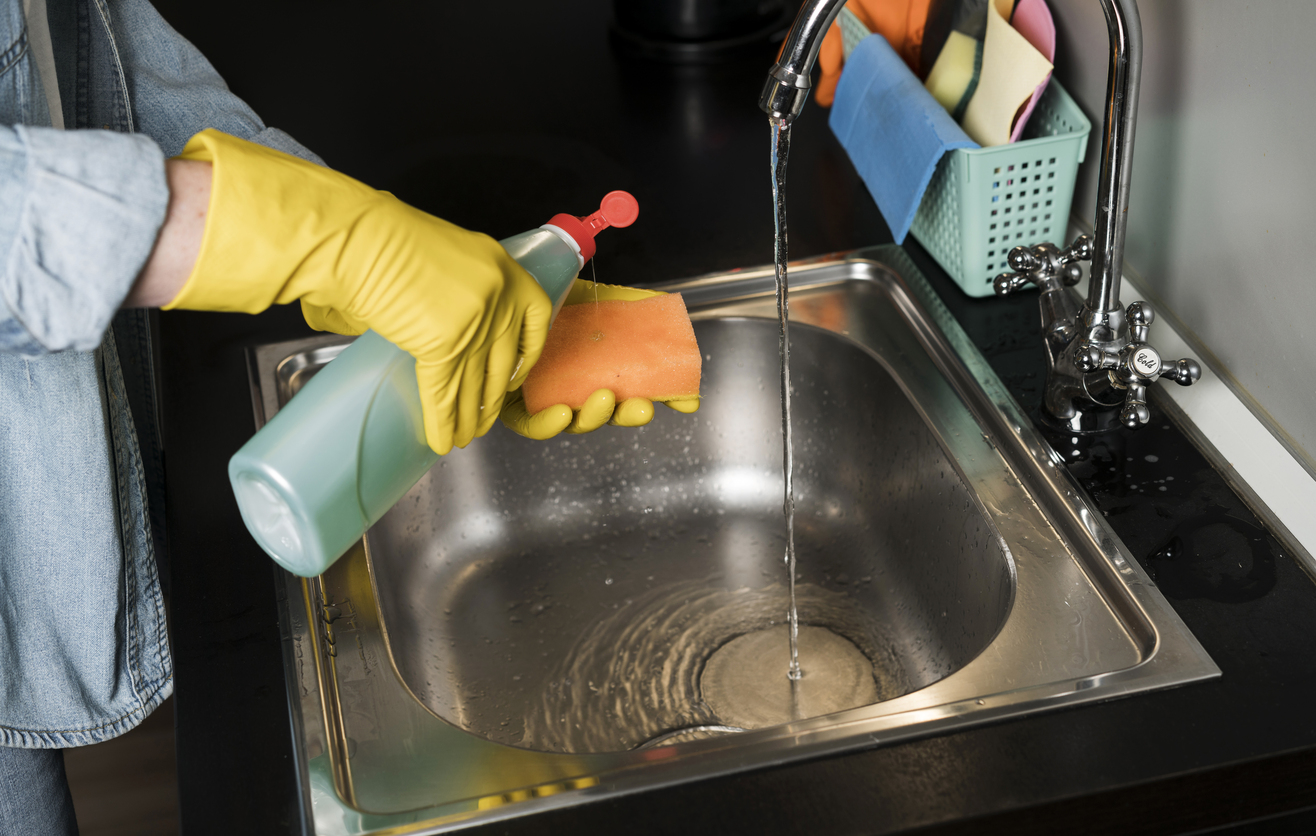
Step 3. Cleaning the Sink Basin
Now that we’ve prepared our stainless steel sink, it’s time to roll up our sleeves and get into the heart of the cleaning process. In this pivotal phase, we’ll be focusing on the sink basin, employing a trifecta of gentle yet effective techniques to banish grime and reveal the sink’s pristine shine.

• Apply a Mild Dish Soap: Squeeze a small amount of mild dish soap onto a soft cloth or sponge. Opt for a dish soap that is gentle yet effective, ensuring it won’t harm the stainless steel surface.
• Gently Scrub the Sink Basin: Start scrubbing the sink basin using the soapy cloth or sponge. Pay careful attention to corners, edges, and areas prone to accumulating grime. Use circular motions to cover the entire surface systematically.
• Utilize a Brush for Hard to Reach Areas: For those elusive nooks and crannies, grab a toothbrush or a soft brush. Apply the dish soap to the bristles and delicately scrub hard to reach areas. Ensure thorough coverage, leaving no space untouched by the cleansing process.
This meticulous approach ensures that every inch of the sink basin receives the attention it deserves, paving the way for a gleaming and sanitized centerpiece in your kitchen.
Step 4. Removing Stains and Hard Water Deposits
As we continue our expedition towards a spotless stainless steel sink, the focus shifts to conquering stubborn stains and hard water deposits that may have tarnished its brilliance. In this pivotal step, we unveil the power of a simple yet effective solution—baking soda. Let’s delve into the details of banishing those unwelcome marks and deposits with a targeted approach.
• Create a Paste with Baking Soda and Water: Measure out an appropriate amount of baking soda. Gradually add water, stirring until a thick, spreadable paste forms. Ensure a balanced mixture, not too runny nor overly dry.
• Apply the Paste to Stained Areas: Identify stained or deposit laden areas within the sink. Use a spatula or your fingers to apply the baking soda paste evenly. Allow the paste to sit on the stains for a few minutes, enabling its natural abrasive properties to work their magic.
• Scrub with a Soft Cloth or Sponge: Armed with a soft cloth or sponge, gently scrub the stained areas. Utilize circular or back and forth motions, applying moderate pressure. Continue scrubbing until the stains and hard water deposits start to lift away, revealing a refreshed and revitalized stainless steel surface.
This targeted approach with baking soda ensures a chemical free solution that not only effectively tackles stains but also preserves the integrity of your stainless steel sink.
Step 5. Cleaning the Faucet and Fixtures
As we traverse the steps to a pristine stainless steel sink, attention to detail extends beyond the basin itself. Faucets and fixtures, often overlooked, play a pivotal role in the overall presentation. In this phase, we delve into the art of enhancing not just cleanliness but also the aesthetic appeal of these crucial components.
• Use a Mild Cleaner or a Vinegar Solution for Faucets: Select a mild cleaner or opt for a natural vinegar solution. Mix the cleaner or vinegar solution in a spray bottle for easy application. Ensure the chosen cleaner is safe for stainless steel surfaces. Avoid abrasive cleaners that may cause damage or scratches.
• Wipe Down Fixtures with a Damp Cloth: Dampen a soft cloth or sponge with water. Gently wipe down the faucet and fixtures to remove surface dirt. Pay attention to crevices, joints, and intricate details. Use a toothbrush or cotton swab for hard-to-reach areas.
• Dry Thoroughly to Prevent Water Spots: After cleaning, use a dry microfiber towel to thoroughly dry the faucet and fixtures. Ensure all water droplets are removed to prevent the formation of water spots. Pay extra attention to areas prone to water accumulation. The drying step contributes to the overall shine and prevents unsightly spots on the stainless steel surface.
Step 6. Apply Polish and Shine
With the stainless steel sink now immaculately clean, it’s time to elevate its brilliance to new heights. Begin by applying a specialized stainless steel cleaner or a touch of nourishing olive oil. These elements not only enhance the sink’s shine but also provide a protective layer against future smudges. After application, take a clean, dry microfiber towel and meticulously buff the sink, unveiling a lustrous finish that radiates cleanliness and sophistication. This final touch not only showcases your dedication to a pristine kitchen but also ensures your stainless steel sink stands as a beacon of gleaming excellence in your culinary space.
Step 7. Drain and Garbage Disposal Maintenance
Ensuring the holistic cleanliness of your stainless steel sink involves not only surface care but also a focus on the often-neglected realms beneath. Begin by cleaning and deodorizing the drain with a natural concoction of baking soda and vinegar—this dynamic duo works to break down deposits and eliminate unwanted odors.
Moving to the garbage disposal, enhance its freshness by running a mixture of ice cubes and citrus peels through the mechanism. The ice helps dislodge debris, while the citrus peels infuse a pleasant fragrance, leaving your sink not just impeccably clean but also radiating a revitalizing scent. By incorporating these simple yet effective maintenance steps, you ensure a thorough and long-lasting cleanliness that extends beyond what meets the eye.
Final Touches
In the concluding stage of our stainless steel sink revitalization, it’s time for the finishing touches that ensure a flawlessly clean and functional centerpiece. Begin by conducting a meticulous inspection, checking for any lingering spots or stains that may have eluded the earlier cleaning efforts.
Address these with targeted care, ensuring every inch of the sink gleams. Following this scrutiny, shift focus to the sink’s readiness for immediate use. Employ a dry microfiber towel to ensure the stainless steel surface is impeccably dry, eliminating any residual water droplets and preventing the formation of water spots. With these final touches, your stainless steel sink stands not only impeccably clean but also ready to serve its practical purpose in your kitchen with optimal brilliance.
Maintenance Tips for a Clean Stainless Steel Sink
Maintaining the pristine allure of your stainless steel sink is not merely a one-time endeavor but an ongoing commitment to its longevity and aesthetic appeal. The following maintenance tips provide invaluable insights into regular upkeep, safeguarding against stains, scratches, and ensuring your sink continues to shine.
• Suggestions for Regular Upkeep to Prevent Stains and Scratches:
To maintain the impeccable appearance of your stainless steel sink, adopt a thoughtful approach by incorporating these key practices into your cleaning routine. Firstly, employ soft scrubbing tools, such as gentle sponges or microfiber cloths, ensuring that abrasive materials are avoided to prevent scratches during regular cleanings. Secondly, steer clear of harsh chemical cleaners, as their abrasive nature can compromise the protective layer of the stainless steel, leading to undesirable stains or dullness over time. Prioritize proactive stain removal by swiftly addressing spills, acidic substances, or stubborn stains, preventing them from settling and causing long-term damage.
• Recommendations for Daily and Weekly Maintenance Routines:
To uphold the enduring brilliance of your stainless steel sink, it’s imperative to weave a tapestry of diligent maintenance into your daily and weekly routines. Begin each day with a swift wipe-down, employing a damp cloth to whisk away surface debris and thwart the accumulation of grime. Post-dishwashing, indulge your sink with a warm-water rinse, eradicating any lingering soap residue or food particles.
Elevate your commitment to cleanliness with a weekly deep cleaning ritual, dedicating time to lavish attention on the faucet, fixtures, and executing a thorough basin scrub. By seamlessly integrating these maintenance practices, your stainless steel sink becomes more than a mere fixture; it transforms into a resilient, visually captivating centerpiece that weathers the demands of daily kitchen activities with grace and enduring charm.
Conclusion:
As we conclude our odyssey to rejuvenate the allure of your stainless steel sink, let’s reflect on the key steps that have transformed this cleaning endeavor into a gratifying and transformative experience. From the initial clearing of the sink to the meticulous attention given to fixtures and faucets, each step has contributed to the restoration of brilliance and hygiene.
Regular maintenance is the guardian of this newfound radiance. Embrace the habit of daily wipes, post-dishwashing rinses, weekly deep cleans, and the application of stainless steel polish. By adopting these practices, you not only preserve the pristine appearance of your stainless steel sink but also ensure its enduring resilience against the wear and tear of daily use. So, let the gleam resonate, and may your kitchen’s centerpiece continue to captivate with its brilliance and maintain its hygienic allure in the days and years to come.